
ELISA Experimental Design Steps and Precautions
Enzyme-Linked Immunosorbent Assay (ELISA) is one of the core branches of immunolabeling technology, alongside immunofluorescence technology, immunoradiometric technology, and immunocolloidal gold technology. With advantages such as rapid efficiency, qualitative and quantitative capabilities, and convenient operation, it is widely applied in scientific research experiments and clinical detection fields. Its core principle is to immobilize specific concentrations of antigens or antibodies on the surface of polystyrene microplates through physical adsorption, then after adding test samples, utilize the specific binding reaction between antigens and antibodies to indirectly reflect the presence and quantity of the detected antigen or antibody through the intensity of enzyme-labeled substance color development.
The success of ELISA experiments not only relies on high-quality kits and standardized operations but also scientific and reasonable experimental design — from mastering the principles of coating and blocking to planning microplate well positions, precise preparation of reagents, and standardizing details of the entire process operation. Each link directly affects the accuracy, repeatability, and reliability of experimental results.
I. Principles of Coating and Blocking
1. Characteristics of Solid Carriers
The foundation of ELISA experiments is the specific binding of antigens and antibodies, while coating and blocking, as the core preliminary steps of the experiment, directly determine the binding effect of solid carriers and are key to avoiding non-specific reactions and reducing experimental background values.
In ELISA experiments, solid carriers need to have strong protein adsorption capacity, no participation in chemical reactions, and easy to be made into standardized specifications. Common carriers include polystyrene, as well as polyvinyl chloride, microporous filter membranes, magnetic particles, etc. Polystyrene is the most commonly used solid carrier with strong protein adsorption, high surface finish, low blank value, and can be made into 96-well microplates, test tubes and other standardized specifications, suitable for most conventional ELISA experiments, and is the first choice for scientific research and clinical detection. Polyvinyl chloride is soft, thin and cuttable, low in price, and has better protein adsorption performance than polystyrene, but its surface finish is poor and blank value is slightly higher, suitable for qualitative experiments with low requirements for experimental precision. Microporous filter membranes and magnetic particles are special carriers. Microporous filter membranes are suitable for rapid filtration and separation of reaction systems, while magnetic particles can achieve rapid separation through magnetic fields. Both are suitable for special experimental scenarios and are less used in conventional experiments.
2. Selection of Antigens and Antibodies
The quality of antigens and antibodies is the core prerequisite for the success of ELISA experiments, and their purity and activity directly affect binding specificity and color development effects. Antigens are mainly divided into three categories: natural antigens, recombinant antigens, and synthetic peptide antigens. Natural antigens are derived from animal tissues, body fluids or microbial cultures, with components close to natural state, but low purity, more interference, and need to be purified before use. Both recombinant antigens and synthetic peptide antigens are artificial products with high purity, less interference, and safe use, but with high preparation technical difficulty and cost. Among them, recombinant antigens have activity closer to natural antigens and are currently the most widely used type in ELISA experiments. Experimental antibodies need to select antibodies with strong specificity, high affinity, and high purity to avoid false positive results caused by antibody cross-reactions, and at the same time, need to select suitable capture antibodies and detection antibodies according to experimental purposes.
3. Operational Principles of Coating and Blocking
Coating is the process of immobilizing antigens or capture antibodies on the carrier surface, while blocking is a supplementary step to eliminate residual adsorption sites on the carrier surface after coating and reduce non-specific reactions. Both need to strictly follow standardized operations. When coating with polystyrene 96-well microplates as carriers, antigens or antibodies need to be dissolved in appropriate buffer, added to microplate wells according to the specified volume, and placed at 4℃ overnight to allow antigens/antibodies to firmly bind to the well wall surface through physical adsorption. If the protein concentration in the coating solution is too low, the solid carrier surface cannot be completely covered, and proteins in subsequently added serum samples and enzyme conjugates will adsorb to carrier residual sites, producing non-specific color development and leading to high experimental background values; at this time, after coating is completed, the carrier needs to be coated again with blocking solution to fill residual adsorption sites and eliminate interference, which is the process of blocking.
To simplify the experimental process and improve the stability and reliability of detection results, ExKits series kits have completed all pre-coating and blocking treatments before leaving the factory. Users do not need to perform time-consuming operations such as coating and blocking themselves, and can directly carry out subsequent experiments, which not only shortens the experimental cycle but also effectively avoids experimental errors caused by operational differences.
II. Scientific Experimental Design
1. Microplate Well Position Planning
• Standard well setting: Reserve 2 columns of micro wells as standard spotting wells, set 8 gradient concentrations, with 2 columns of replicate wells for each concentration; when adding samples, add standard working solution from low concentration to high concentration, sequentially from bottom to top into ELISA plate wells to avoid cross-contamination of high concentration standards to low concentration wells.
• Sample well setting: The remaining 10 columns of the microplate can be used as test sample spotting wells. It is recommended to set 2-3 replicate wells for each sample. If the sample size is small, the number of replicate wells can be appropriately reduced, but at least 1 replicate well should be retained to ensure data repeatability.
• Experimental group setting: According to experimental needs, reasonably divide experimental groups, such as normal control group, model group, drug administration group, etc. The sample size of each group should meet statistical requirements to ensure that experimental conclusions are persuasive, and blank control wells should also be set.
2. Sample Processing Specifications
The standardization of sample processing directly affects the accuracy of detection results. The core is to avoid sample contamination and ensure the activity of the test substance. The specific processing points are as follows:
• Sample dilution: According to the concentration range of the detection index and kit requirements, determine whether sample dilution is needed. If the concentration of the test substance in the sample is too high, exceeding the detection range of the kit, it is necessary to perform gradient dilution with sample dilution buffer to avoid color development saturation caused by high concentration. During dilution, the dilution multiple should be strictly controlled and mixed to avoid dilution errors.
• Sample storage: After collection, test samples need to be processed in a timely manner. It is recommended to aliquot for storage to avoid repeated freezing and thawing, which may cause degradation and activity loss of the test substance. Short-term storage can be placed at 4℃, and long-term storage needs to be placed at -20℃ or -80℃ environment.
• Contamination prevention and control: During sample processing, sterile disposable consumables should be used, and the operating environment should be kept clean to avoid sample contamination by microorganisms or cross-contamination, which may affect experimental results.
III. Full-Process Experimental Operation
1. Add standard and sample:
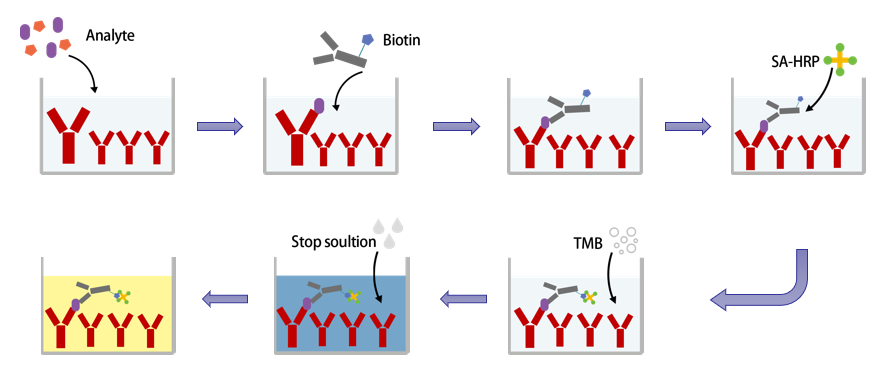
Add different concentrations of Standard working solution to the first two columns of ELISA plate wells from top to bottom, two wells for each concentration, 100μL per well.
Add 100μL of the sample to each of remaining wells. High concentration samples need to be diluted first.
During operation, solutions should be added to the bottom of the micro ELISA plate well, avoid touching the inside wall, shake gently to mix, avoid bubbles, and complete the sample addition operation within 10 minutes.
2. Cover the plate and incubate:
Cover the plate with the Plate Sealer provided in the kit. Incubate at 37℃ for 90min.
3. Biotinylated Detection Ab working solution:
Tear off the sealer, remove and dry the liquid in the plate wells, no need to wash.
Add 100μL of Biotinylated Detection Ab working solution to each well. Shake gently to mix, and cover the plate with a new Plate Sealer. Incubate at 37℃ for 60min.
4. Wash plate 1:
Manual Washing:
Aspirate or decant the liquid in the plate wells, add 350μL of Washing solution to each well, Soak for 1-2min, aspirate or decant the liquid in the plate wells, pat it dry against clean absorbent paper, and complete one wash. Repeat this wash step 3 times. Complete removal of liquid at each step is essential to good performance.
Microplate Washer:
350μL/well, shake the plate for 3–5 seconds.
5. Add HRP Conjugate working solution:
Add 100μL of HRP Conjugate working solution to each well. Gently shake to mix, cover the plate with a new Plate Sealer. Incubate at 37℃ for 30min.
6. Wash plate 2:
Wash the plate 5 times, the steps are the same as step 4 (Wash plate 1).
7. Add Substrate Reagent (TMB):
Add 90μL of Substrate Reagent (TMB)to each well. Cover the plate with a new Plate Sealer. Incubate at 37℃ for about 15min, Protect the plate from light.
Tips: Adjust the incubation time according to the color change, but do not exceed 30 minutes. Once the standard wells show a clear gradient, the incubation can be stopped.
8. Stop the reaction:
Add 50μL of Stop Solution to each well to stop the reaction.
Tip: The order of adding Stop Solution should be as consistent as possible with the order of adding Substrate Reagent (TMB).
9. Measure the OD value:
Immediately measure the OD value (optical density) of each well of the ELISA plate with a micro-plate reader set to 450nm.
IV. Kit Usage and Experimental Full-Process Precautions
1. Reagent management: When using kits of different brands and batches, clear labels should be made to prevent mixing of reagent components, which may lead to experimental failure. After opening the kit, microplates and standards should be stored according to the component storage condition table.
2. Reagent usage: The reagent volume provided by the kit is slightly more than the amount indicated on the label. During use, sterile disposable tips should be used to avoid cross-contamination. After use, reagent bottle caps must be tightened immediately to prevent microbial contamination and reagent evaporation.
3. Operation specifications: During the detection process, reagents needed for the next experimental step should be prepared in advance. After plate washing, reagents should be added to the wells in a timely manner to prevent well drying, which may lead to detection failure. Do not reuse disposable tips, EP tubes and other consumables to avoid cross-contamination.
4. Safety protection: Wear a lab coat, mask, gloves and other protective equipment during the experiment for proper personal protection. Especially when testing blood or other body fluid samples, biological contamination shall be avoided.
5. Personalized adjustment: Different brands and models of ELISA kits may have differences in experimental operation steps, incubation time, reagent ratio, etc. During experiments, the instructions of the corresponding kit should be carefully read, and experimental time should be reasonably arranged to avoid experimental failure due to inconsistent operations.
6. During manual plate washing, the tips or droppers for adding washing solution must not touch the ELISA plate wells. Insufficient washing or contamination can easily cause false positives and high background.
7. After sample addition is completed, a sealing film should be applied to prevent sample evaporation during incubation, and incubation should be completed at the recommended temperature.